How to Make an AI Zombie Short Film
Build a post-outbreak horror short with AI — lock the film look once, cast a survivor who stays the same person in every shot, then write the day scene by scene in the editor.
Zombie horror is the friendliest genre to start an AI short film in, and it is not because zombies are easy to draw. It is because the genre forgives the things AI is worst at and rewards the things it is best at. Faces are grimy and half-lit. Weather does the color grading for you. The monsters are supposed to move wrong. What horror actually demands is the one thing AI used to be terrible at — the same survivor, recognisably the same person, in every single shot. That is the problem this guide solves first.
Key takeaways
- Lock the film look ONCE at the project level — it is prepended to every prompt, so scene twelve matches scene one.
- Build your survivor in the Actor Creator before you write a single shot; casting after the fact is how a short turns into a slideshow of lookalikes.
- @mention the actor in the prompt and describe only what they DO — not what they look like.
- Write one day, not one clip. Six to ten short shots with a beginning, a scare and a quiet beat is a film.
- Horror hides AI's weaknesses: rain, dark, handheld and grime cover the exact details models still fumble.
- The complete 10-second, nine-shot prompt used for this film is on this page, ready to copy.
What you are going to make
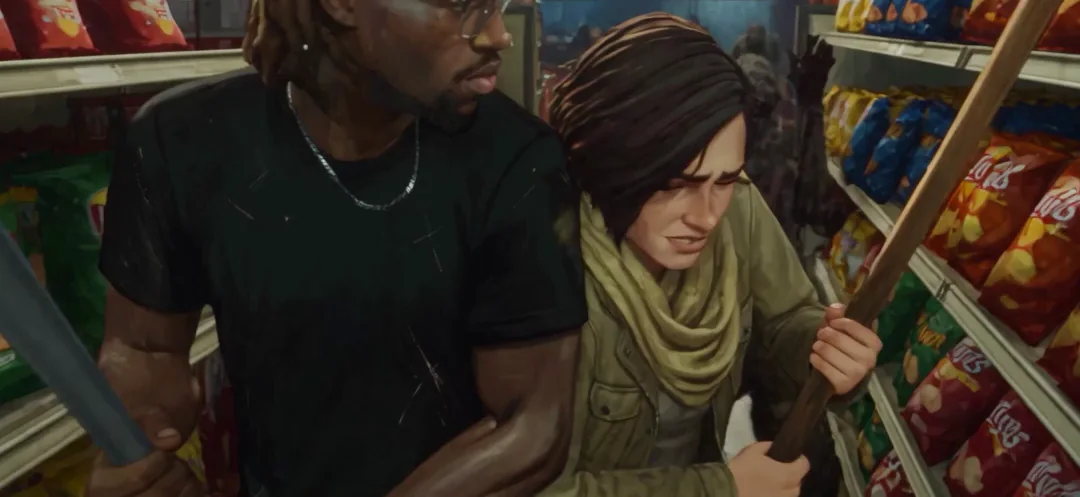
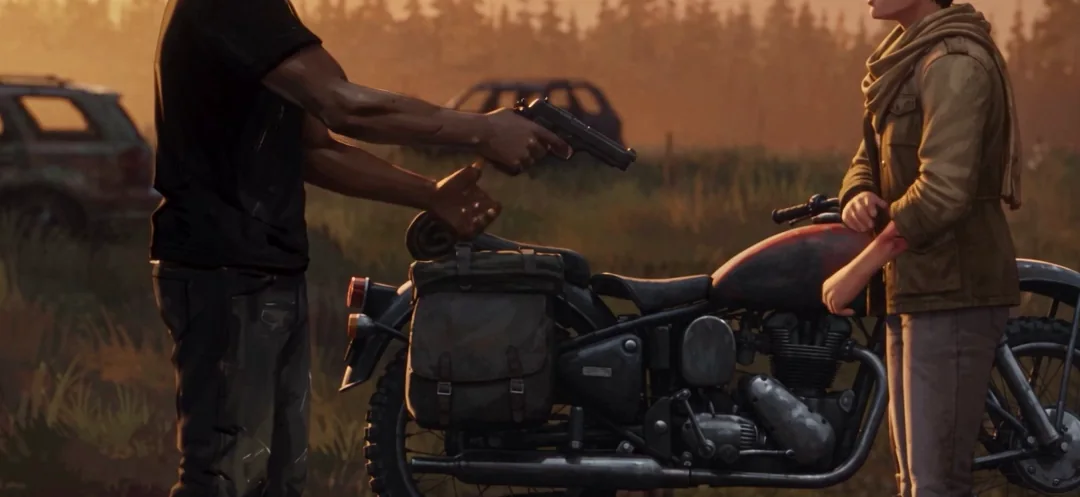
A short post-outbreak horror film: one survivor, one bad day, six to ten shots. A raid on a wrecked diner, a supply run that goes wrong in a grocery aisle, a quiet beat where two people share food in a stairwell, a ride out on a stolen motorcycle, and a standoff at golden hour that decides how it ends.
Every still on this page came out of that project. Read the steps in order — the whole method is front-loaded, and by the time you are writing shot prompts the hard part is already done.
Step 1 — Lock the look before you write anything
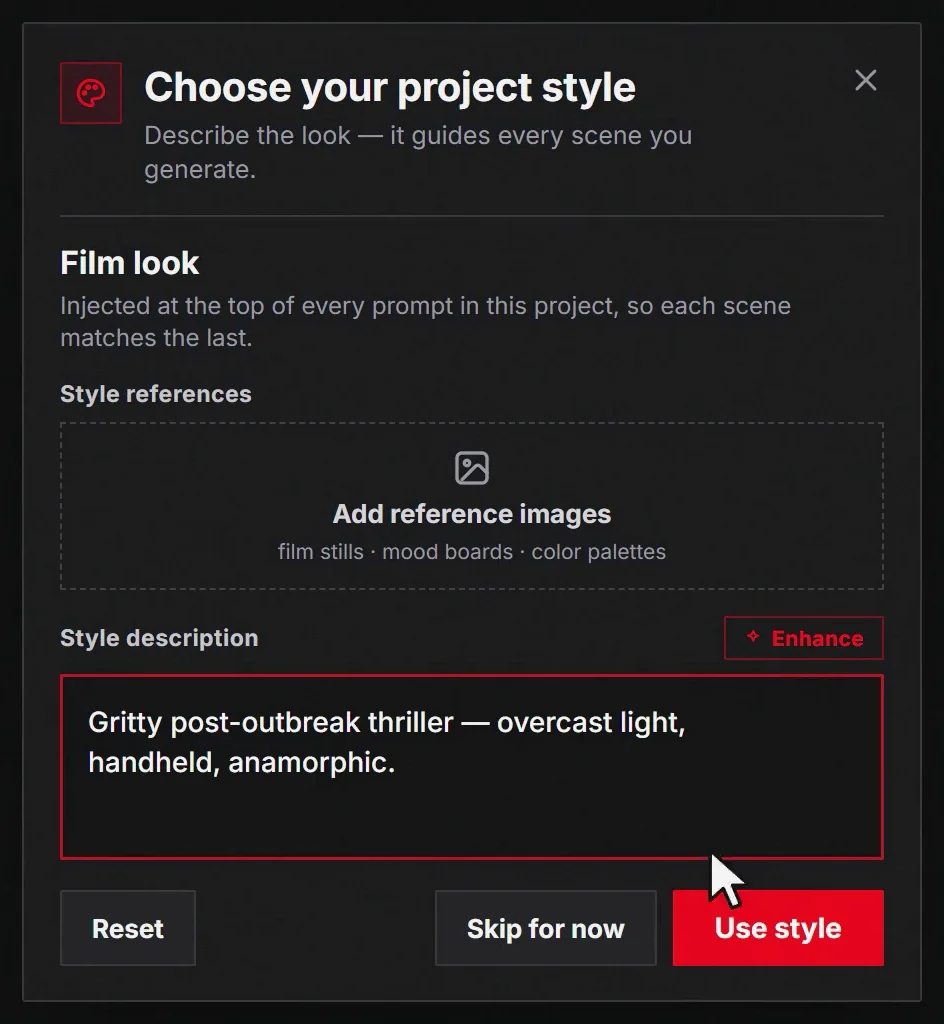
The first thing a new project asks is what it should look like. Answer it properly and you never have to answer it again.
The Film look you type here is injected at the top of every prompt in the project. That is the whole trick: you are not describing a style to one shot, you are setting the grade for the entire film. Skip this and you will spend the rest of the day pasting the same four adjectives into every prompt and still getting twelve different films.
For this one the description was one sentence:
Gritty post-outbreak thriller — overcast light, handheld, anamorphic.
Why one sentence beats a paragraph
Four things are doing work in that line and nothing else is. Gritty post-outbreak thriller sets genre and era. Overcast light kills the sunny, plastic look AI defaults to and flattens the contrast the way real horror is shot. Handheld stops every frame from looking like it was locked off on a tripod. Anamorphic widens the frame and softens the highlights.
If you want it richer, the Enhance button expands your line into a fuller look description without you having to know the vocabulary. Add reference images — film stills, mood boards, a color palette — and it pulls from those too.
Reference images beat adjectives
If you already know the film you are chasing, drop three or four stills into Style references instead of trying to describe them. A palette is much easier to show than to write, and the look you get back will be closer to the one in your head.
Step 2 — Confirm the look actually holds
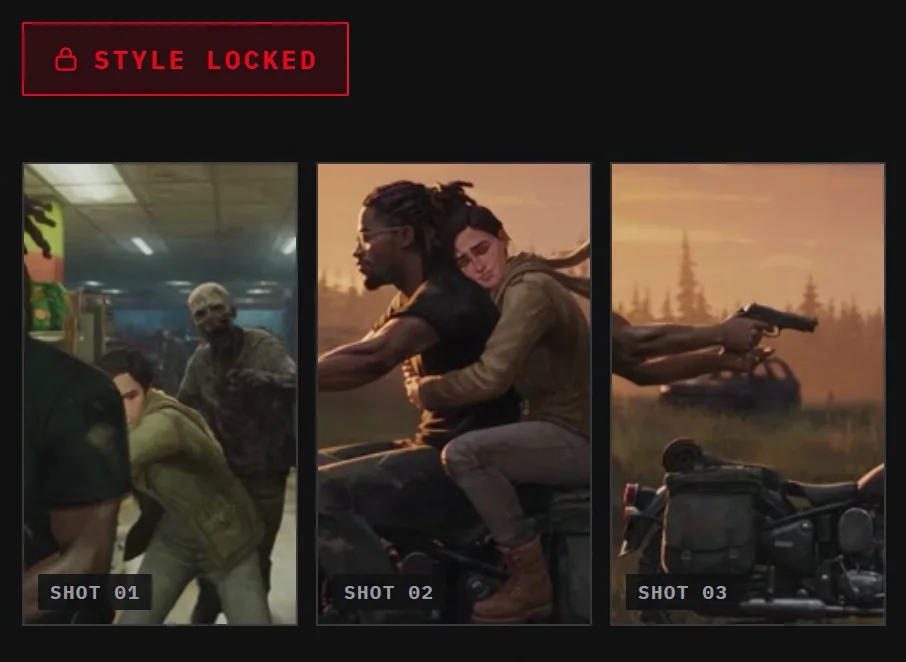
Once the style is locked, generate two or three unrelated shots and put them side by side. They should look like they came off the same camera on the same afternoon — same grade, same light, same grain.
This is a thirty-second check and it is worth doing before you build anything on top of it. A look that drifts at shot three will drift at shot thirty, and by then you have paid to generate all of them.
Step 3 — Cast your survivor
This is the step people skip and it is the step that decides whether you end up with a film or a mood board.
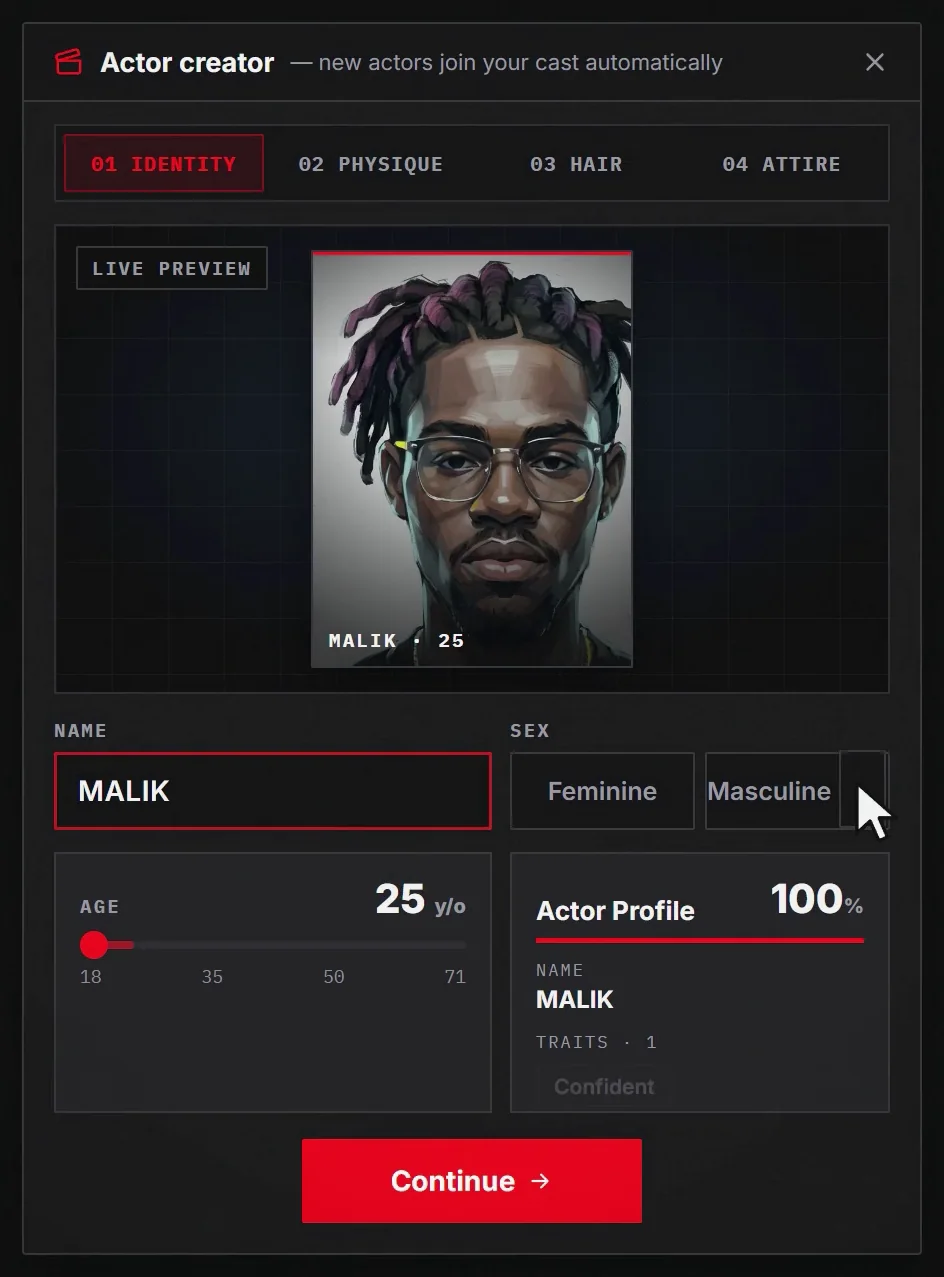
A horror short lives on one face you follow through the worst day of their life. If that face changes between shots — a different nose, different hair, a different age — the audience stops tracking a person and starts noticing the software. So build the character once, in the Actor Creator, before you write a single shot.
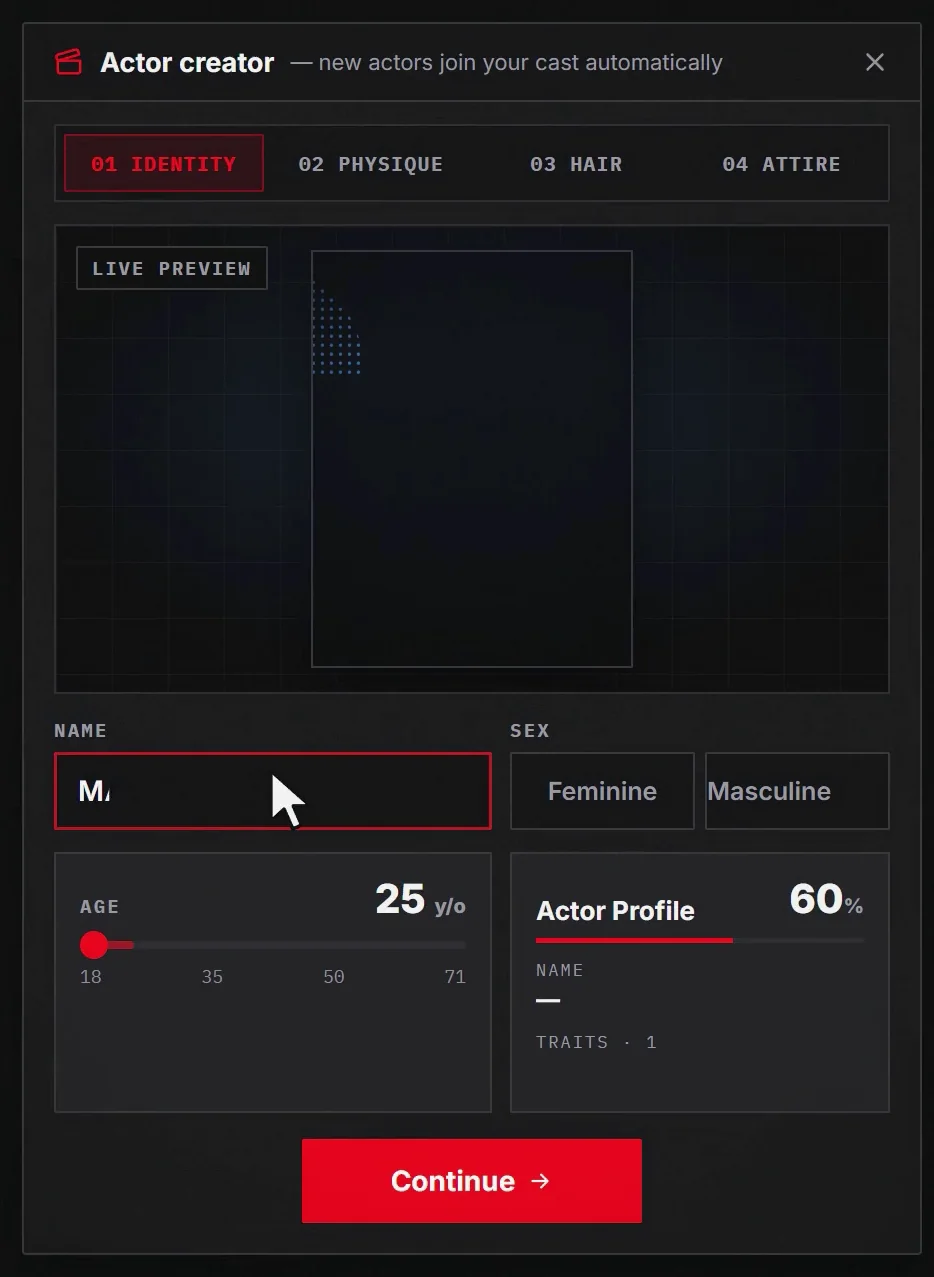
You give them a name, a sex, an age, and then work through physique, hair and attire. The live preview updates as you go and a profile meter tells you how complete the identity is — the fuller it is, the more stable that person stays across scenes.
Cast the survivor, not the hero
Horror casting is not action casting. Tired beats heroic. Give them something that reads as history — a scar, a bad haircut they gave themselves, clothes that have been worn for weeks. The genre is about people who are losing, and a face that looks like it has already lost something does more for the film than a jawline.
Two people are better than one
Build a second actor and your options triple. One survivor alone is a series of reaction shots. Two survivors can disagree, share food, and point a gun at each other — which is where the actual story in most zombie films lives. New actors join the project's cast automatically, so a second character costs you one more pass through the same screen.
Step 4 — Take the character sheet seriously
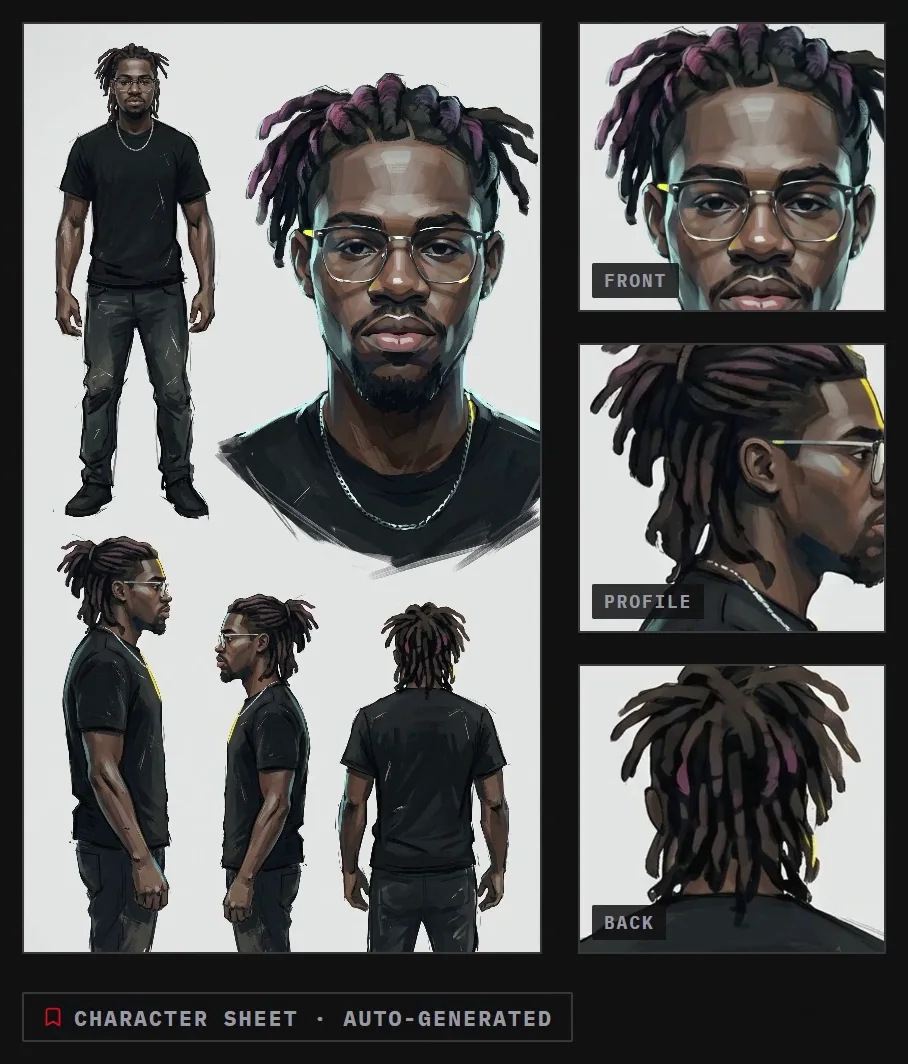
When the actor is finished you get a character sheet — front, profile, back, and a hair detail — generated from the identity you just built.
Do not skim past it. This sheet is the reference every future shot is measured against, and it is your only chance to catch a problem while it is still cheap. Look at the back view. Look at the hair from behind. If something is wrong there, it will be wrong in every shot where they walk away from camera, and re-casting now costs one generation instead of ten.
Step 5 — Write the shot, not the character
Now the prompts get short, and that is the point.
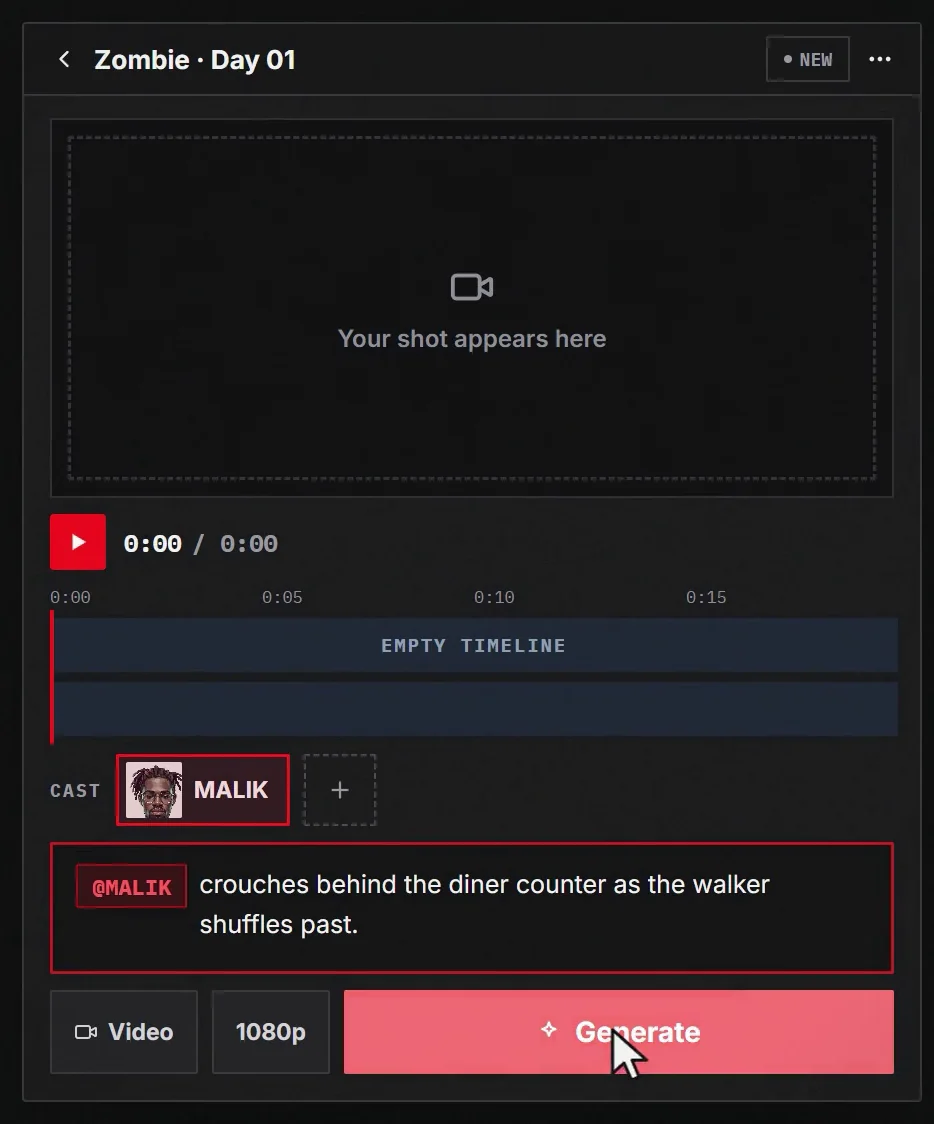
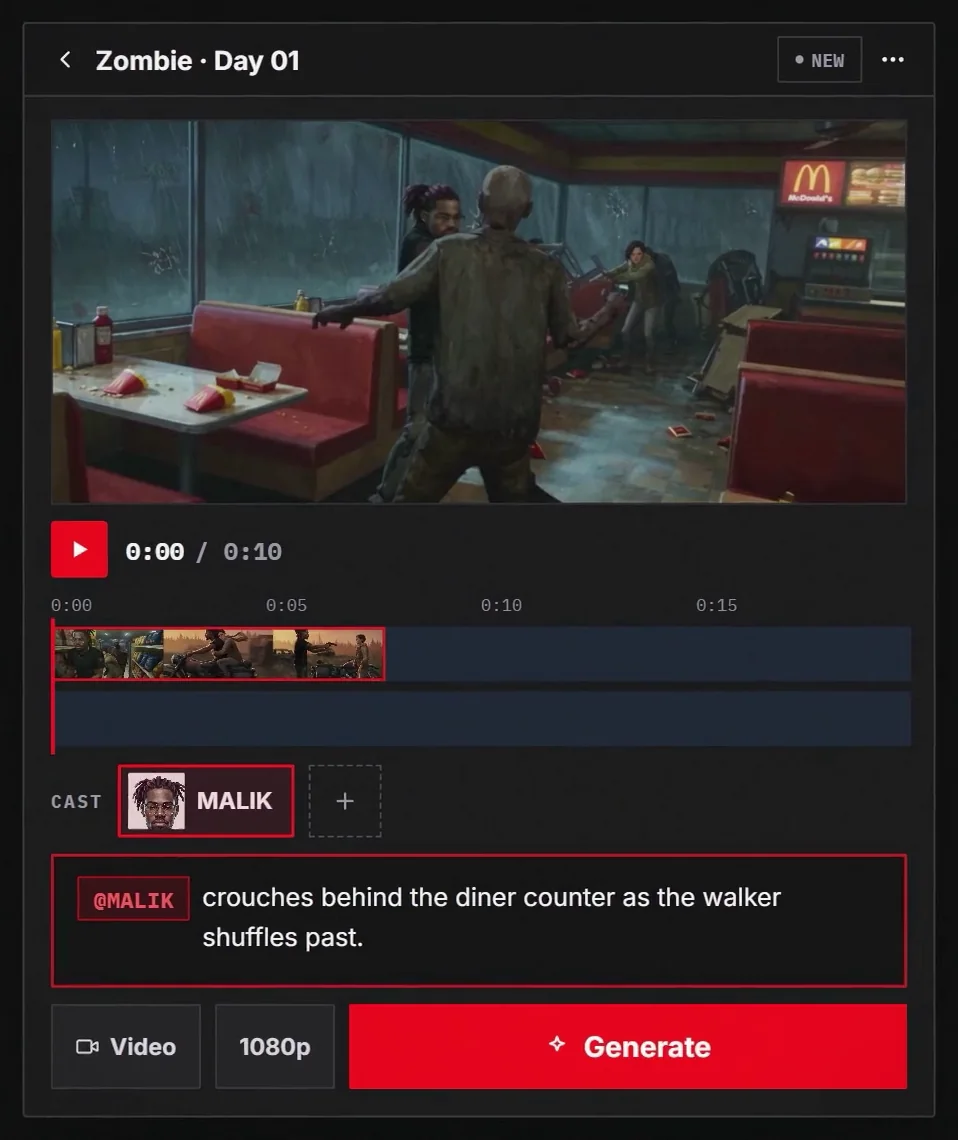
In the editor, @mention your actor and the cast chip goes into the prompt. From there you describe only what they do — the action, the camera, the moment. You have already described who they are; repeating it fights the reference you spent the last two steps building.
The first shot of this film was one line:
@MALIK crouches behind the diner counter as the walker shuffles past.
The shape of a good horror prompt
Who (the @mention) · what they are doing · what the threat is doing. That is it. Notice that the line above never says the walker is scary, never says the lighting is tense, and never mentions the grade — the project style is already carrying all of it.
The verb matters more than the adjectives. *Crouches* is a whole performance. *Is scared* is nothing a camera can photograph.
Let the threat be off-balance
Write the zombie as behaving wrongly rather than as looking horrifying — shuffles past, stumbles into a shelf, turns towards a sound too slowly. Models render broken movement convincingly, and an audience reads wrong movement as dread long before it reads a close-up of a face.
Step 6 — Generate, then judge it honestly
Pick your format and resolution and generate. The shot lands in the preview and drops onto the timeline as a clip you can play, trim and build on.
Then do the part that actually makes the film good: judge it as a shot, not as a generation. Does it cut with the one before it? Is the survivor the same person? Does it earn its place? Keep the takes that work and regenerate the ones that do not. A short film is the sum of shots that earned their place, not the first result of every prompt.
Step 7 — Write a day, not a clip
This is what separates a short film from a nice-looking ten seconds.
Give yourself one day in the life of the survivor and break it into beats. The structure that works, almost every time:
The raid — they need something and the place that has it is not empty. The mistake — a noise, a locked door, a second walker nobody saw. The quiet beat — two people, some food, no threat on screen. This is the shot everyone cuts to save time, and it is the one that makes the ending land. The escape — movement, finally. A vehicle, a road, distance. The choice — the ending is a decision between two people, not a fight between a person and a monster.
Six to ten shots of that is a film with a shape. Ten of your best-looking shots in a row is a showreel.
Step 8 — The whole film in one prompt
Everything above builds the film shot by shot. There is a second way to work, and it is worth having both: describe the entire thing in one specification and generate it in a single pass.
Below is the complete prompt for a 10-second, nine-shot survival-horror short — the rescue, the favour returned, the shared food, the ride, the bite, and the choice. It is the same shape as the beats in the step above, written out in full. Copy it, run it, then start changing things.
10-second cinematic survival-horror short. A rapid, emotionally connected montage: a rescue becomes a friendship, then a devastating discovery. Immediate action, distinct locations, expressive performances, and an increasingly quiet ending. No dialogue, narration, subtitles, or title cards.

VISUAL STYLE

Gritty, semi-realistic digital painting matching the supplied references. Solid architectural perspective and believable human proportions, rendered through opaque, angular brushstrokes and layered patches of color. Clothing folds are constructed from broad, faceted shadow shapes with smaller broken strokes catching their edges. Concrete, skin, fabric, and metal retain distinct textures beneath the painted treatment. Dry, scumbled marks describe grime; thin, scratchy strokes suggest rain, loose hair, and distant structures.

Detail and sharpness concentrate around faces, hands, silhouettes, and important objects. Architectural edges are crisp; fabric edges are irregular; unlit contours merge into large, connected shadow masses. Background figures remain loosely suggested but anatomically coherent. The brush texture stays attached to surfaces as they move, maintaining stable faces and silhouettes between frames.

Lighting has convincing direction and falloff, interpreted through painted planes. Concentrated highlights glow softly into damp or dusty air. Wet surfaces catch fragmented reflections following the ground’s perspective. Most materials remain matte, worn, and dirty. Muted charcoal, olive, muddy brown, and midnight blue dominate; isolated mustard yellow, blood red, and pale cyan-green provide emphasis. Sunset introduces weathered amber and copper. Deep shadows retain colored undertones and readable volume.

CHARACTER AND PROP CONTINUITY

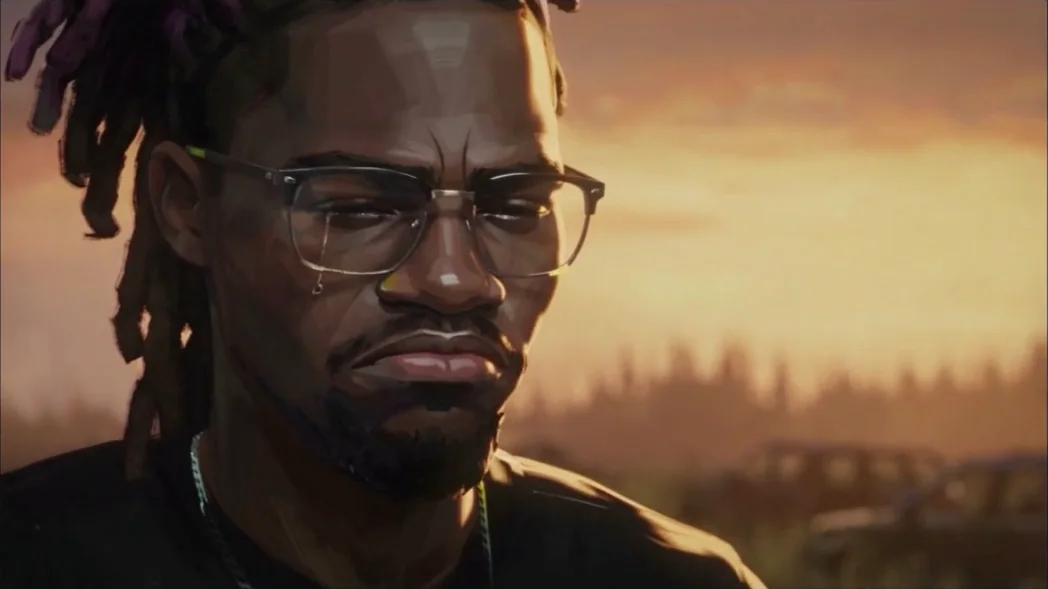
The man is a Black adult in his early thirties, with dark brown skin, medium-length black dreadlocks tied behind his head, a short goatee, and expressive brown eyes. He wears a weathered rust-brown work jacket, charcoal shirt, dark cargo trousers, and battered black boots. A small black backpack stays on both shoulders. His weapon during the action is a short steel pipe held in his right hand. A black pistol remains secured in his right-hip holster until the final scene.

The woman is an adult in her mid-twenties, with warm medium-brown skin, a short dark bob, and a small notch in her left eyebrow. She wears an olive field jacket, a faded mustard scarf, gray trousers, and brown boots. She carries a short red crowbar in her right hand during the shared fighting scene. Her left forearm stays covered until the bite reveal.

Their faces, body proportions, clothing, and equipment remain identical across every cut. Dirt and fatigue accumulate subtly. The motorcycle is consistently one battered black motorcycle with a faded red fuel tank, one headlight, and a rear luggage rack. From the motorcycle sequence onward, the pipe and crowbar are strapped visibly beside the rack.

SHOT SEQUENCE — EXACTLY 10 SECONDS

[Shot 1 — 0.00–1.25 | THE RESCUE]

Inside a ruined McDonald’s at night. Rain streams down the front windows. Red booths, scattered food packaging, broken ordering screens, and a recognizable golden-arches sign establish the location. Sickly ceiling light reflects across the wet floor.

A low, handheld 28mm view looks down an aisle. The woman is trapped beside a booth at the far end. One zombie blocks her route; additional zombies struggle around overturned furniture in the background.

Action begins mid-swing: the man’s steel pipe strikes the blocking zombie across its upper torso, knocking it sideways into an empty booth and opening the aisle. The woman immediately slips through that opening toward him. The pipe’s arc travels away from her position. His planted foot and rotating shoulders drive the strike; the zombie reacts after contact. The camera recoils with the impact, then catches their movement.

[Shot 2 — 1.25–2.05 | SHE SAVES HIM BACK]

Hard cut to a flooded convenience store on another part of their journey. A chest-height 35mm handheld camera moves alongside them.

The man faces a threat ahead while a second zombie reaches toward his unprotected back. The woman catches that approaching zombie across the chest with her crowbar and drives it backward against a shelving unit. The man turns just far enough to recognize what she has done. Their shoulders briefly meet as they close ranks. One clear defensive action, with each zombie occupying a readable position.

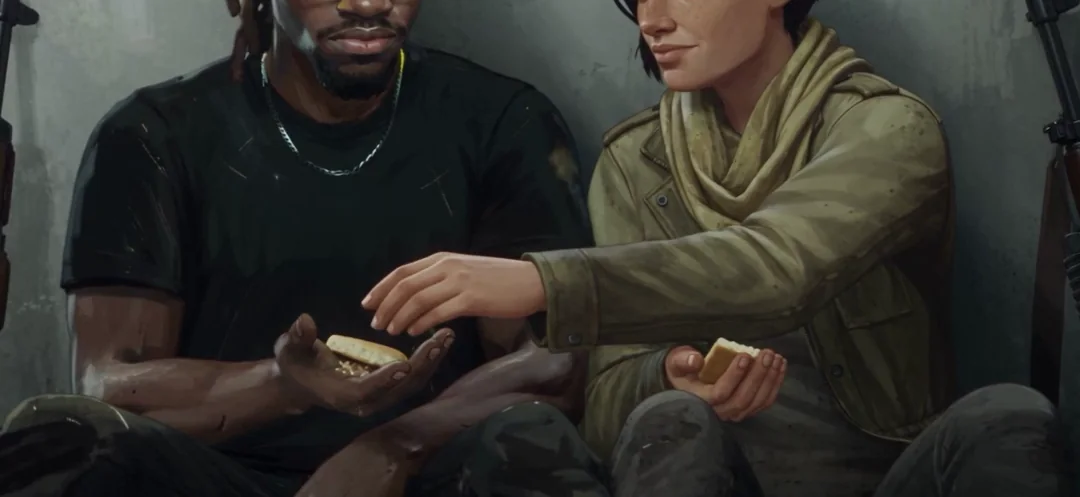
[Shot 3 — 2.05–2.70 | SHARING FOOD]

Hard cut to a quiet concrete stairwell in gray morning light. A close two-shot frames them sitting side by side against a peeling wall, their weapons resting within reach.

The woman is already holding a broken ration biscuit. She places the larger piece into his open palm, keeping the smaller piece. He notices. Their exhausted expressions soften. Crumbs remain in their hands and on their clothing.

[Shot 4 — 2.70–3.30 | THE FRIENDSHIP]

A tighter view from the same side of the stairwell. The woman finishes a sip from a dented metal flask and lowers it. He gives her a small, tired smile; she returns it with a brief shoulder bump. The affection feels spontaneous and understated. Gentle handheld breathing replaces the impact-driven movement.

[Shot 5 — 3.30–4.30 | A MOMENT OF FREEDOM]

Hard cut to a low, moving three-quarter view of their motorcycle traveling left to right along an abandoned road at sunset.

He drives with both hands on the handlebars. She sits directly behind him, both feet on the passenger pegs, arms around his waist. Her scarf and loose hair stream backward consistently with their movement. The motorcycle’s wheels rotate against the road, its suspension responding to cracked asphalt.

Copper sunlight catches their painted silhouettes. Abandoned cars and dark trees slide past with coherent parallax. She leans close to his shoulder, smiling into the wind.

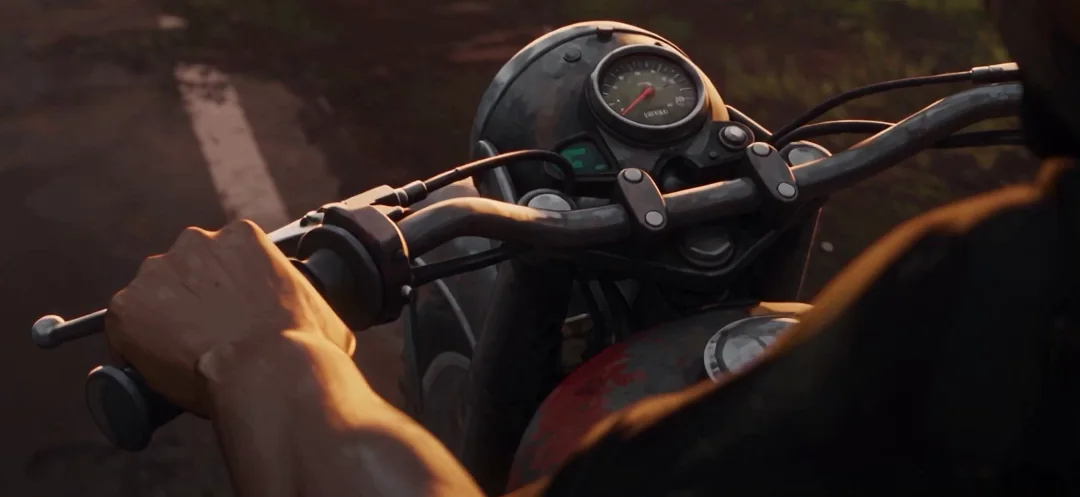
[Shot 6 — 4.30–5.35 | OUT OF FUEL]

Hard cut over his shoulder toward the motorcycle’s worn instrument cluster. The fuel needle rests at empty. The engine coughs, loses power, and falls silent.

The road remains visible beyond the handlebars as the motorcycle coasts slowly onto the gravel shoulder. He squeezes the brake and lowers his left boot as it stops. Her arms loosen around him. Their bodies respond to the deceleration together. The fading sunset maintains the same direction as the previous shot.

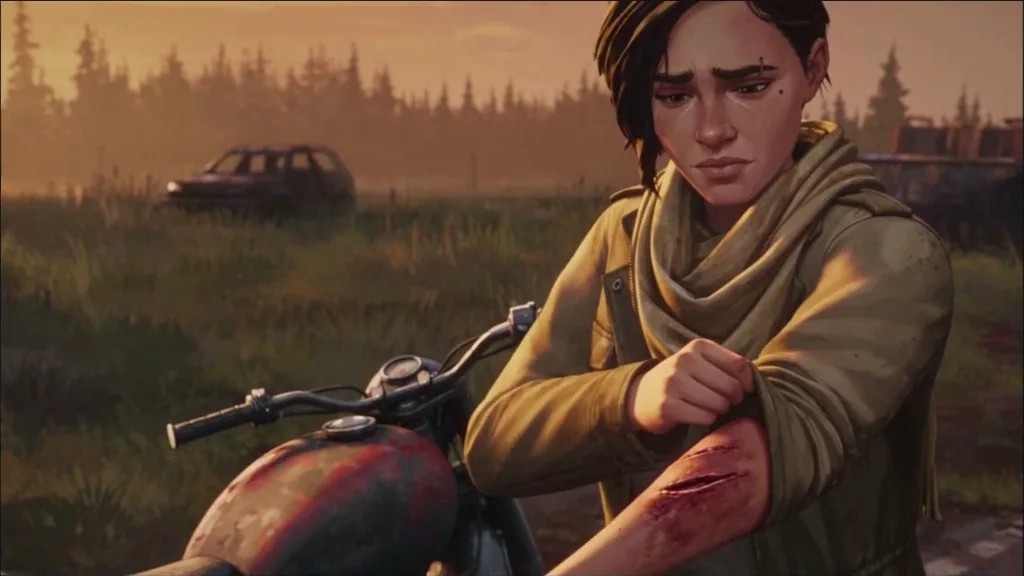
[Shot 7 — 5.35–6.55 | THE BITE]

Hard cut forward to both standing beside the parked motorcycle on that same roadside. The man occupies screen left; the woman occupies screen right. Preserve these positions through the ending.

In a close medium shot, she draws back her left jacket sleeve with her right hand, revealing an unmistakable crescent of bite punctures surrounded by bruised, darkened skin. The wound stays localized to her left forearm.

Focus shifts gently from the exposed bite to her face. Her earlier smile is gone. She looks toward him, frightened but fully conscious, holding her arm still so he can understand.

[Shot 8 — 6.55–7.65 | UNDERSTANDING]

Hard cut to a tight close-up of the man, looking screen right toward her. His expression changes through small, readable movements: his eyes fix, his jaw tightens, and his lower eyelid trembles.

A single tear gathers at his right lower eyelid and travels down his cheek, catching the last warm light. He takes one unsteady breath. The camera has only a faint human tremor. Hold long enough to read his face.

[Shot 9 — 7.65–9.80 | THE IMPOSSIBLE CHOICE]

Cut to a restrained medium-wide profile two-shot. He stands on the left, she stands on the right, approximately two meters apart. Their faces and the space between them remain visible. The motorcycle rests behind them on its stand; both melee weapons remain secured to its rack.

His right hand draws the pistol from the established right-hip holster. His left hand joins the grip, and he slowly raises it until the muzzle points toward her. The motion is continuous and hesitant, with the weapon retaining a fixed shape and correct attachment to his hands.

She lets her bitten arm fall to her side and keeps looking at him. He cannot hold the gun perfectly steady. The tear remains visible on his cheek. The camera inches closer with subdued handheld movement. Hold the final aim for the last half-second of the shot. Both characters remain alive; the pistol stays unfired.

[9.80–10.00 | BLACK]

Hard cut to complete black. No muzzle flash, gunshot, impact, or aftermath.

CAMERA, EDITING, AND SOUND

Use motivated handheld movement: footstep bob during action, a brief reactive jolt at physical contact, subtle vibration beside the motorcycle, and restrained breathing movement during intimate shots. Preserve readable framing through every shake. Motion blur follows actual movement while faces and key actions remain recognizable.

Every location change is a clean editorial cut with an intentional passage of time. Maintain consistent screen direction within each scene. Bodies have stable anatomy, planted contact points, and believable weight; grips remain attached to weapons; clothing follows movement with natural delay.

Sound follows the story: the pipe’s metallic impact, wet footsteps, a shelf rattling, a biscuit cracking, a quiet shared breath, the motorcycle engine, then its uneven sputter. A restrained musical pulse supports the friendship montage and disappears at the bite reveal. Wind and his breathing carry the final seconds. Silence on black.
Why this one is long when Step 5's was one line
Because they are doing different jobs, and the difference is the whole lesson.
The one-liner in Step 5 works inside a project where the film look is already locked and the actor already exists as a reference. It can be short because almost everything has already been said elsewhere.
This prompt is self-contained. There is no project carrying the style and no cast carrying the faces, so it has to carry all of it itself — and it is describing nine cuts, not one shot. Length here is not decoration; every paragraph is holding something that would otherwise drift.
The continuity block is the part that matters
If you only adapt one section, adapt CHARACTER AND PROP CONTINUITY. It fixes both people down to the eyebrow notch and the boot colour, states which hand holds which weapon, and says where the pistol stays until the last scene.
That is not fussiness. Across nine cuts the failure mode is never the acting — it is the jacket changing colour, the crowbar vanishing, or the gun appearing in a shot it has no business being in. Describing the props as precisely as the faces is what keeps nine shots reading as one film.
How to adapt it without breaking it
Keep the four-part skeleton — style, continuity, timed shot list, then camera and sound — and swap the contents.
Change the people and their clothes, change the locations, change the ending. What to leave alone: the explicit timecodes, the screen-left/screen-right positions in the last three shots, and the closing instruction that the pistol stays unfired. Those are the lines stopping the model from inventing its own ending.
What it deliberately does not do
There is no dialogue, no narration and no title cards, because spoken performance is still the hardest thing to generate and a short film that needs words to work will expose that immediately. The story is carried by one shared biscuit, one smile and one tear.
It also ends on a cut to black with no gunshot and no aftermath. The restraint is better horror and it keeps the film well inside content rules — you are generating a decision, not an injury.
Step 9 — Use horror to hide what AI is bad at
Every genre has an AI difficulty setting, and horror is the low one. Not because it is less ambitious — because its native visual language happens to cover the exact places current models are weakest.
Darkness and rain hide the detail that falls apart under a clean key light. Handheld makes small inconsistencies between frames read as camera operation. Grime, blood and weather give a face texture instead of the airbrushed look AI drifts toward. Overcast light removes the hard shadows that expose geometry errors.
None of that is cheating. It is the same reason real horror films are shot at night in the rain: the dark is where the genre works.
What to still avoid
Do not write crowds of walkers, long spoken dialogue, or an elaborate physical fight where exact contact matters. Write one threat, close. A single walker three feet away is more frightening than thirty in a field, and it is the shot the model can actually deliver.
Step 10 — Cut it, and cut it short
Assemble the approved shots on the timeline, trim the heads and tails hard, and get out of every shot a beat earlier than feels comfortable. Horror pacing is impatient — the scare lands on the cut, not in the middle of the clip.
Then export. A two-minute zombie short with one consistent survivor, one consistent look and a real ending is a finished film, and it is a far better thing to have made than ten minutes of beautiful unrelated footage.
Limitations & common mistakes
- Crowds of walkers, precise physical fights and long spoken dialogue are still the hardest things to generate — write one threat, close.
- Character consistency depends on the work you do up front: a thin actor profile drifts across scenes no matter how good the prompt is.
- Expect to reject takes. Budget generations for the shots you will regenerate, not only for the ones on your list.
- Generation produces shots; the edit produces the film. The cut is real work and it is where most of the tension comes from.
- Gore and graphic horror sit inside content rules — write dread and implication rather than explicit injury, which is better horror anyway.
Frequently asked questions
How do you keep the same character across every shot in an AI short film?
Build the character once in the Actor Creator before writing any shots, fill the identity out as completely as you can, and then @mention that actor in each prompt instead of re-describing their appearance. The character sheet generated at the end — front, profile, back — is the reference every later shot is measured against.
Why is zombie horror a good first AI short film?
Because the genre's visual language covers what AI is weakest at. Darkness, rain, handheld camera and grime hide fine-detail errors, and a shambling, off-balance creature is something models render convincingly. The genre's real demand — one recognisable survivor throughout — is solved by locking the actor up front.
How long should an AI zombie short be?
Short. Six to ten shots built around one day in a survivor's life is enough for a complete story with a beginning, a scare, a quiet beat and an ending. Length is not the achievement; a film with a shape is.
How do you write a horror shot prompt?
Who, what they are doing, what the threat is doing — and nothing else. The project's film look already carries the grade and the mood, and the actor reference already carries the appearance. Lead with a physical verb; an action can be photographed, an emotion cannot.
Is there a ready-made prompt for an AI zombie short film?
Yes — the complete 10-second, nine-shot prompt used for this film is in Step 8 of this guide, with a copy button. It is self-contained: it carries its own visual style, a full character and prop continuity block for both survivors, a timed shot list, and camera and sound direction. Copy it, run it, then change the people, the locations and the ending.
How long should an AI film prompt be?
As long as the things it has to carry. A one-line prompt is right inside a project where the film look is locked and the actor already exists as a reference, because almost everything has already been said. A self-contained prompt describing nine cuts has to carry the style, both characters, every prop and the timing itself — so it runs to several hundred words, and each paragraph is holding something that would otherwise drift.
Do you need to describe the lighting in every shot?
No, and you should not. The film look set at project level is injected at the top of every prompt, so the grade, the light and the camera style carry across all of them. Repeating it per shot adds nothing and pulls the shot away from the reference.
Written by
Adkeet Team · AI Creative StudioThe Adkeet team builds AI filmmaking and advertising tools — the Actor Creator and the Cinematic Engine Studio. These guides come from workflows we run inside the product every day.
Related tutorials
Make your zombie short
Lock the look, cast the survivor, and generate the first shot of the worst day of their life.