How to Make an AI Superhero Short Film
Put your own face in the suit, write the power moment as one action, and push a shot past its own length with the Director Board — plus the one edit that makes a hero scene land without any more spectacle.
Superhero is the hardest genre to make with AI, and almost everyone gets the reason backwards. It is not that flight and impacts are difficult to generate — it is that spectacle is the one thing the genre gives you infinite amounts of, and none of it is what makes a hero scene work. A shot of someone catching a bus is worth nothing if the audience does not recognise the face doing it, and a triumphant walk means nothing until you know what it cost. This guide fixes the face first, then the moment, then the meaning.
Key takeaways
- One clear, front-facing photo becomes a consistent AI actor with a full character sheet — front, profile and back.
- Write the power moment as ONE action with a physical verb; the suit and the city are set dressing.
- A shot can go past its own length: stretch it on the Director Board and the continuation carries the previous shot's last frame.
- The edit that makes a hero scene land is a close-up and a drop in volume, not more destruction.
- Crowds, clean spoken dialogue and exact physical contact are still where the genre fights you.
What you are going to make
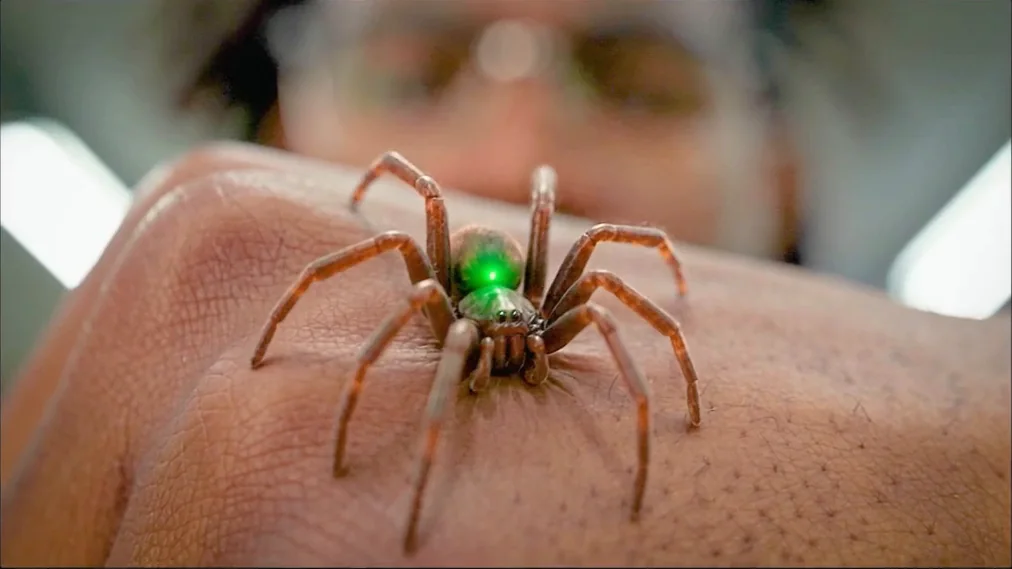
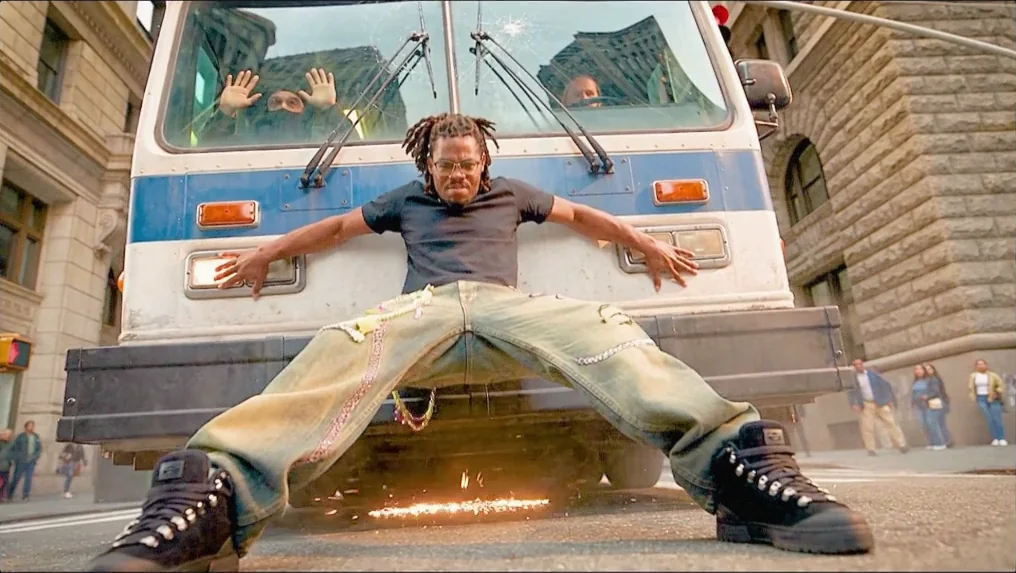
A short superhero sequence with three beats: the origin, the power moment, and the aftermath. One bite, one bus stopped in the middle of a street, and then the quiet shot that tells you what any of it meant.
The stills are from that build and the face in them is a real photograph, uploaded once. The screenshots are from the walkthrough it was made in, so a label here and there is typeset differently to the app — where that matters, the text below names what is actually on your screen.
Step 1 — Put a real face in the suit
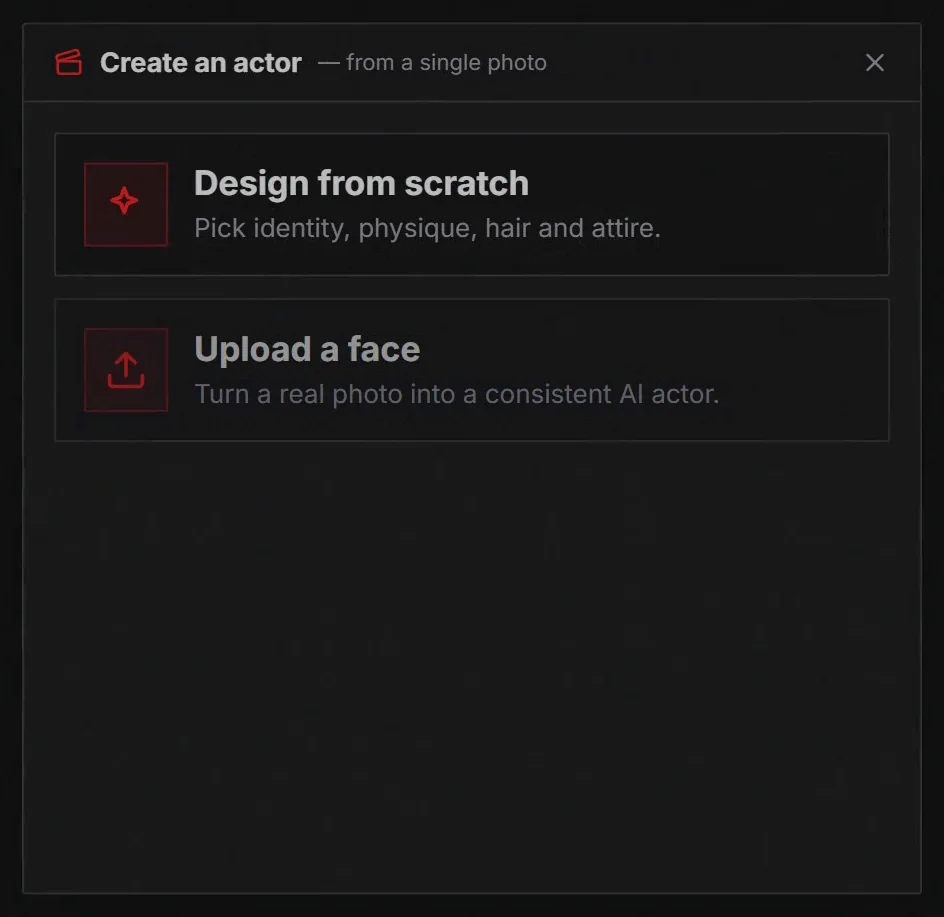
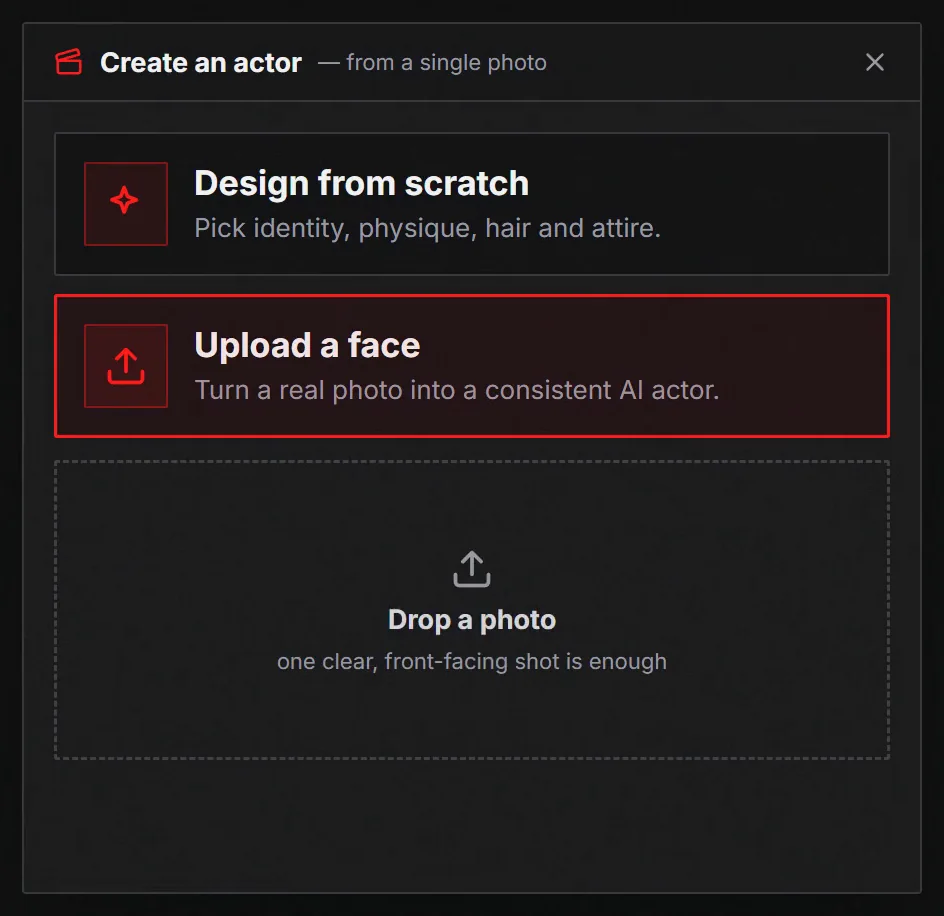
Open a project at the editor, open the Cast panel and click Create actor. The dialog that opens gives you two ways in: Design from scratch, which builds someone out of identity, physique, hair and attire, and Upload a face, which turns a real face photo into a consistent AI actor.
Go in through the editor rather than the standalone builder at /actors/create — that page is only the from-scratch half, and it is where the first card sends you. The upload lives in the dialog.
For a superhero short, take the second card. The genre depends on recognition — the mask coming off has to mean something — and a face you already know, yours or an actor's you have permission to use, does that work before the film starts.
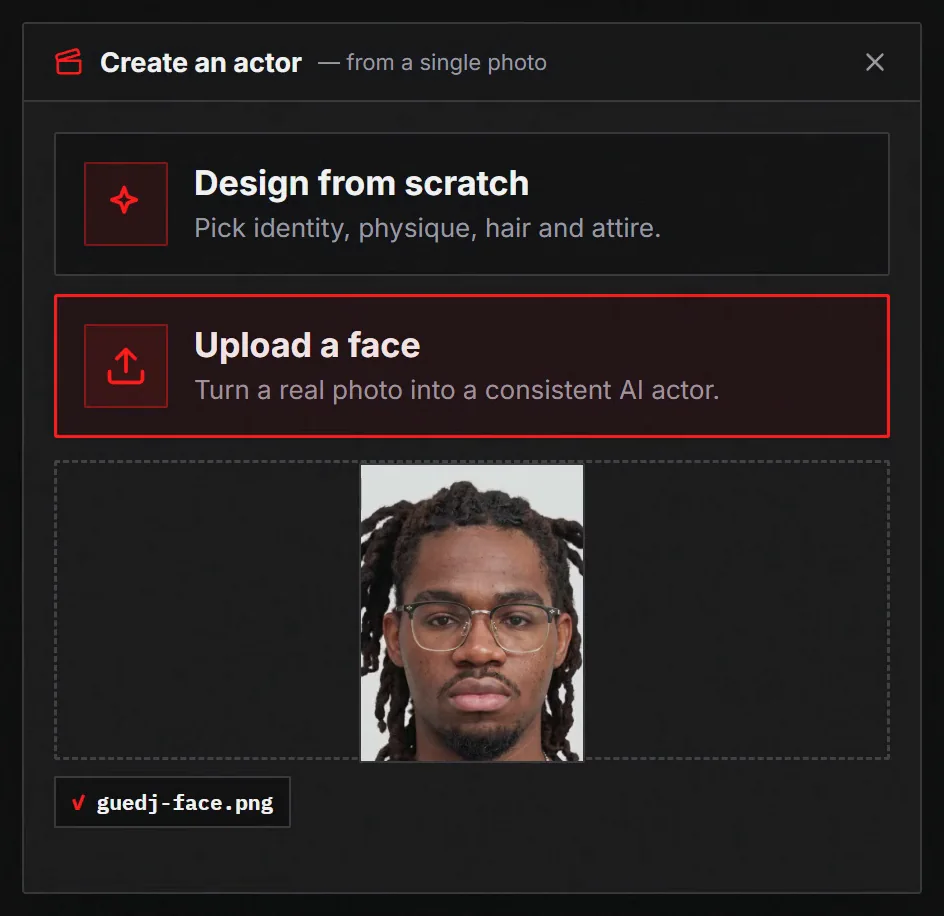
Pick the photo carefully — it is the whole input
One image is all this step takes, which means that one image decides everything downstream. You are not building a photogrammetry rig; you are giving the model a single unambiguous look at a face.
What helps: even light, both eyes visible, a neutral expression, nothing across the face. What hurts: sunglasses, a hard side light that hides half the head, a three-quarter angle, a group photo cropped down, and heavy filtering. A weak source photo is not fixed by a better prompt later — it is baked into every shot that actor appears in.
Only upload a face you have the right to use
Your own is the easy case. Anyone else's needs their permission, and a stranger's photo off the internet is not yours to put in a film. This is the one step in the guide with a consequence outside the edit.
Step 2 — The character sheet is the contract
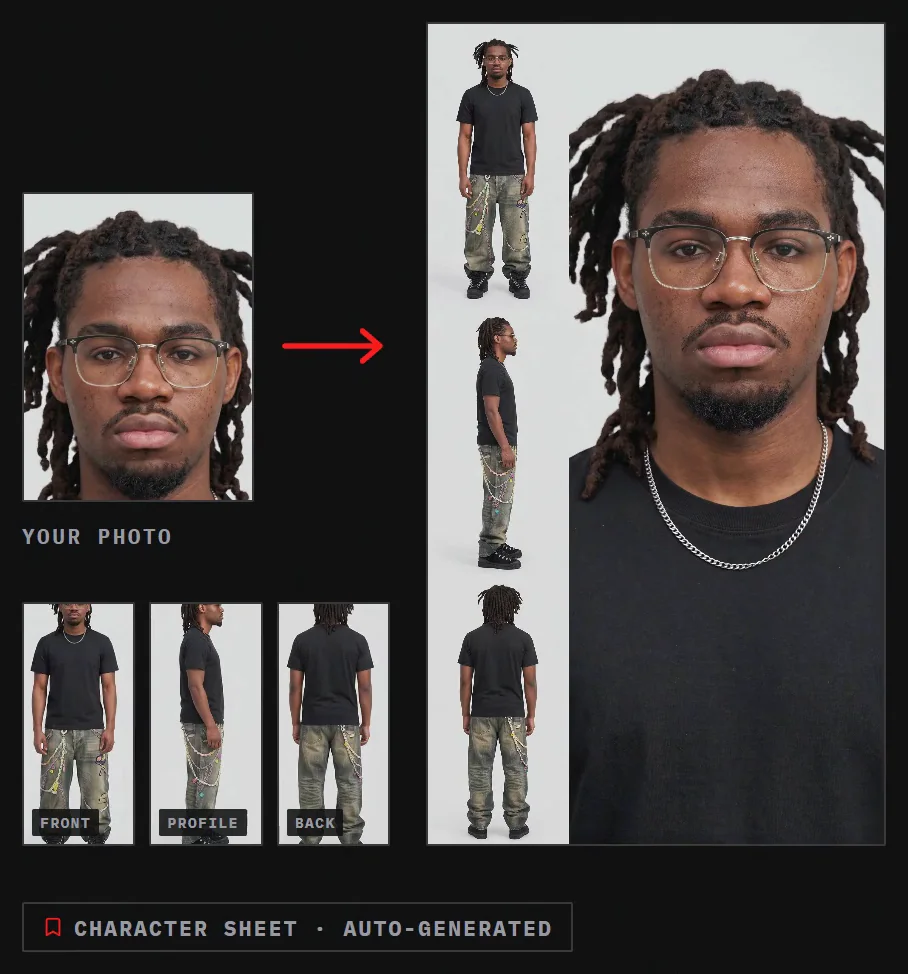
From that one photo you get a full character sheet: front, profile, back, and the whole figure. This is the reference every later shot is measured against, and it is generated before you have written a word of the film.
Look at it properly. The back view and the profile are where a face-from-photo actor is weakest, because your source only showed the front — and the back of the head is exactly what a superhero shot spends its time on, because heroes are forever walking away from things.
Step 3 — Write the power moment as one action
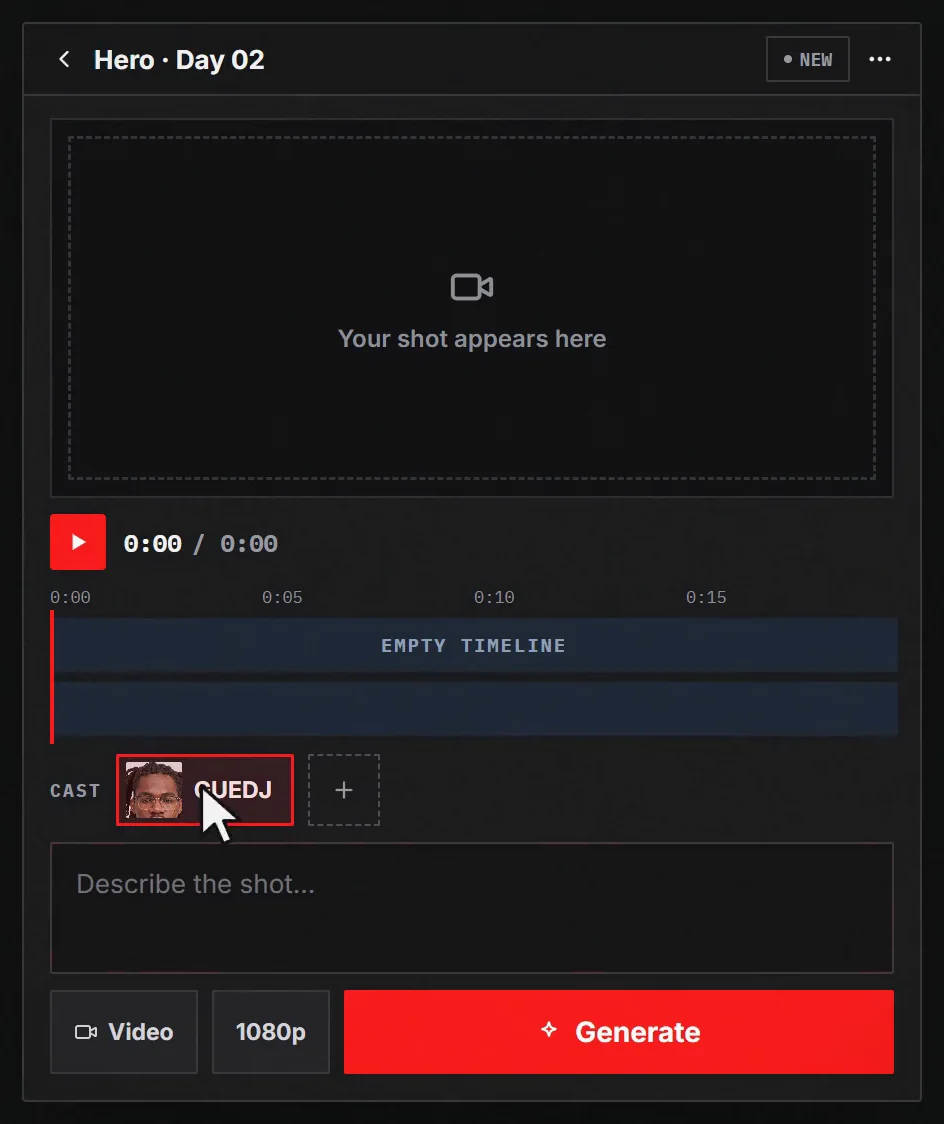
In the editor, @mention your actor so the cast chip goes into the prompt, then describe one thing happening. Not the costume, not the city, not the mood — the action.
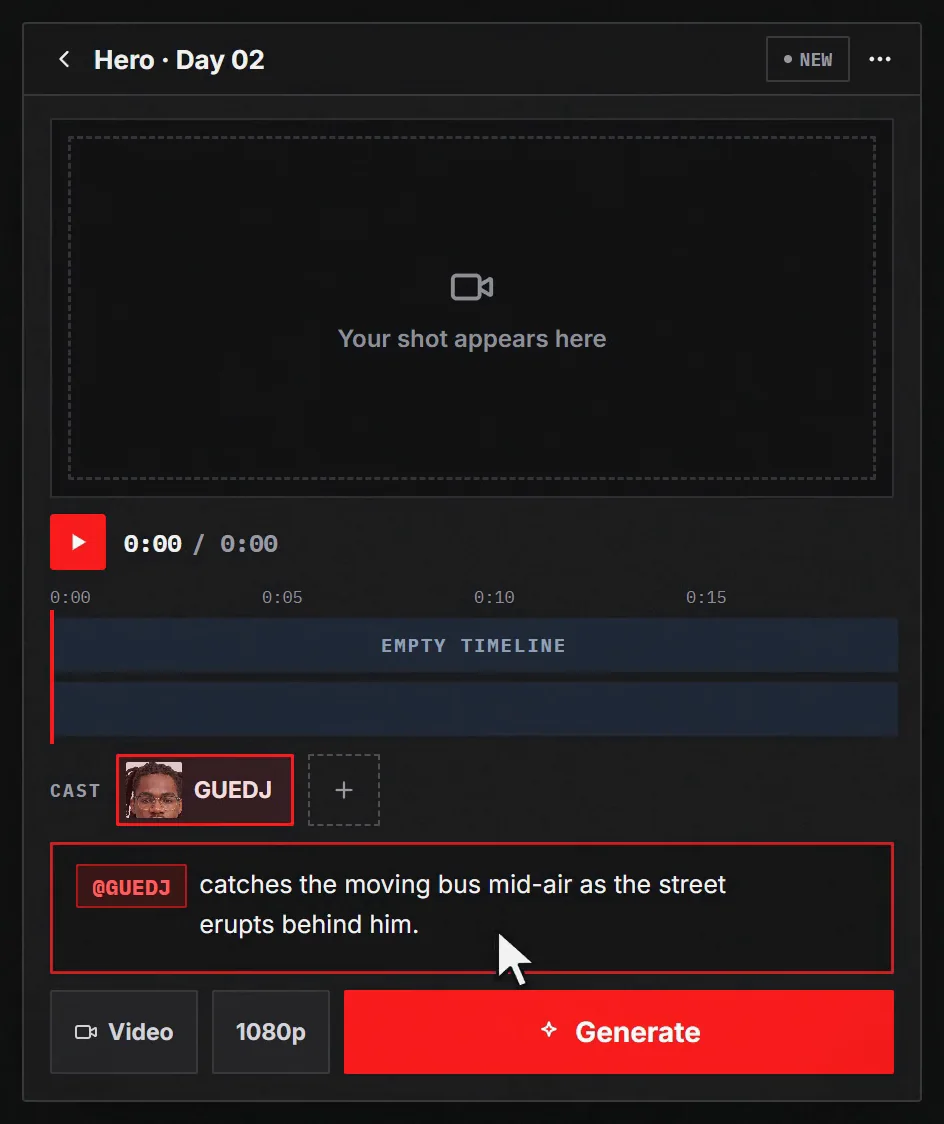
The power moment in this film was one line:
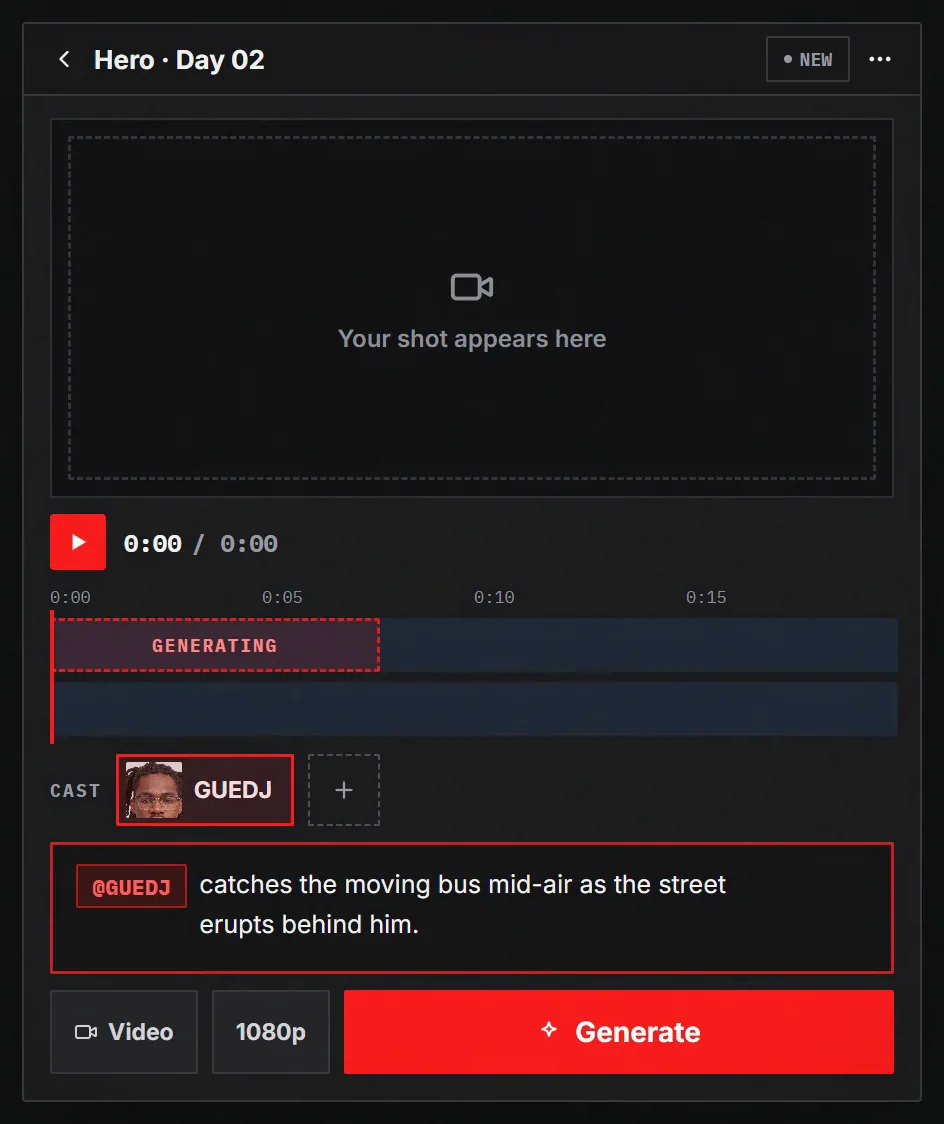
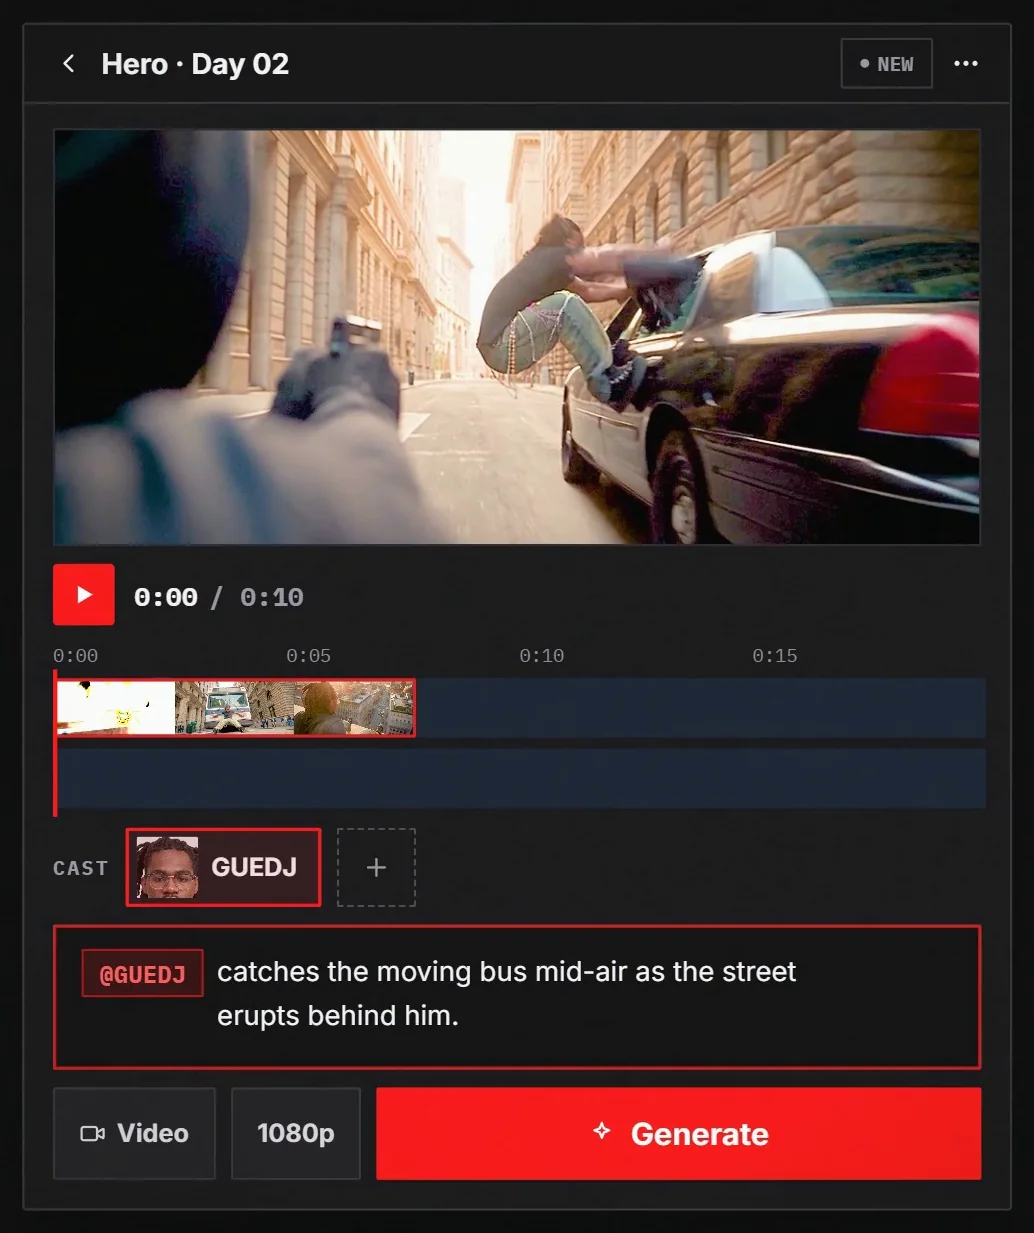
@GUEDJ catches the moving bus mid-air as the street erupts behind him.
One verb, one object, one consequence
Catches is the verb. The moving bus is the object. The street erupts behind him is the consequence. That is a complete action and it is all the model needs.
What is deliberately absent: how strong he is, how heroic it looks, what the lighting is doing. Adjectives about power do not generate power — a physical verb does. "Catches the bus" is a shot. "Shows his incredible strength" is not something a camera can point at.
Keep the impact just off the beat
Superhero shots break at the moment of contact: hands pass through metal, weight goes missing, a bus bends the wrong way. Write the instant just before or just after instead — catching it mid-air, or the street erupting behind him — and you get the same read without asking the model to solve contact physics.
Step 4 — Generate, then judge it as a shot
Pick the format and resolution and generate. The shot lands in the preview and drops onto the timeline as a clip you can play, trim and build on.
Then be strict with it. Is it the same person as the character sheet? Does the weight read? Would you cut to it? Keep the takes that earn their place and regenerate the rest — a sequence is the shots that survived, not the first result of every prompt.
Step 5 — Take a shot past its own length
A generated clip has a length, and a hero beat often needs more than it. You do not have to start a new shot and hope it matches.
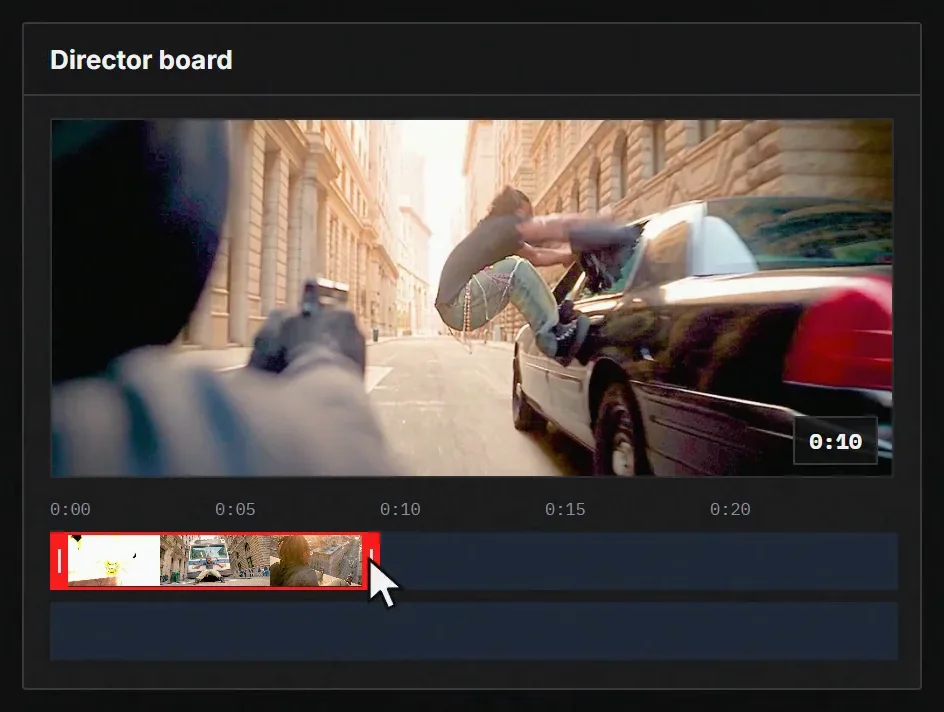
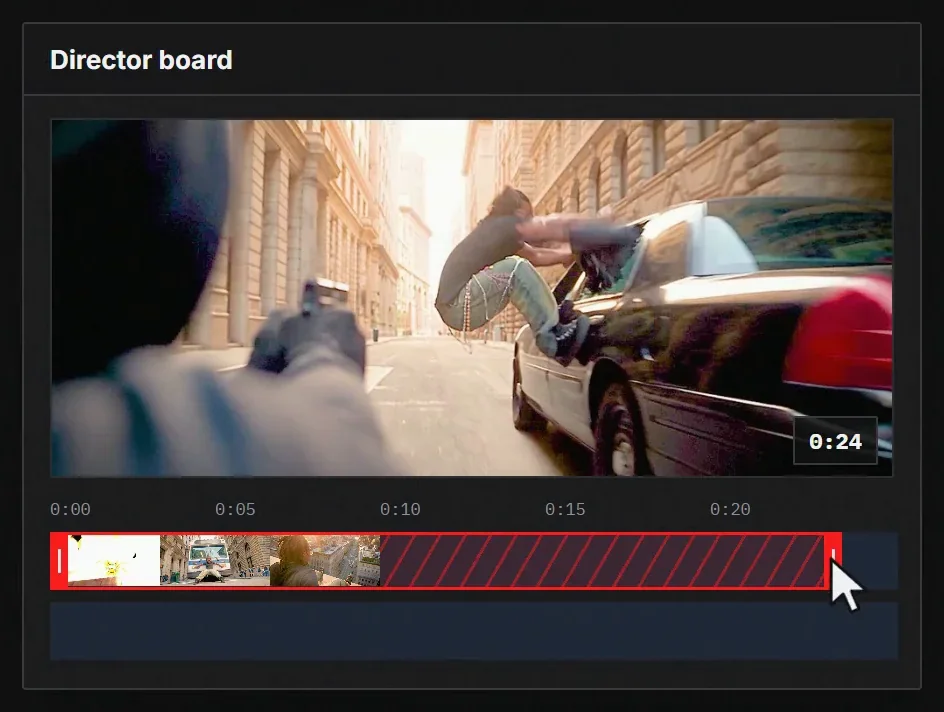
Open the Director Board — D in the editor — and drag the clip longer. The stretch is handed to the generate step as the duration to fill, and the new stretch continues from the previous shot's last frame — which is why the same actor, the same street and the same light carry across the join instead of resetting at it. In this film that took a ten-second shot to twenty-four.
Extend on movement, not on stillness
A continuation inherits the last frame, so what that frame is doing decides how well the join reads. A frame mid-movement — still travelling, still falling, dust still in the air — carries forward cleanly. A frame where everything has already come to rest gives the next stretch nothing to continue, and the seam shows.
The same action is available from a clip's own menu as Continue from here when you would rather add a shot than lengthen one.
Step 6 — The edit that beats more spectacle
This is the part of the genre nobody tells you, and it has nothing to do with generation.
Take a hero walking away from something, battered, toward a sunrise, triumphant music over the top. It reads as a victory. Now change two things and change nothing else: open his fist on a damaged photograph of someone he lost, and take the music out so you hear only footsteps.
Same walk. Same performance. Same footage. The shot now reads as loss. You did not generate anything more impressive — you inserted one close-up and dropped the volume, and the audience did the rest.
Generate both halves, then cut them together
Two prompts, one identical walk, one inserted detail. Run the wide first, then the insert, and cut the insert into the middle of the walk.
Why this works on AI footage in particular
Because performance is the thing models are worst at and editing is the thing they are not doing at all. You cannot prompt a face into carrying grief reliably. You can absolutely cut to a hand, and let the audience put the grief on the face they just saw.
That is the whole lesson: when a hero scene is not landing, the fix is almost never a bigger explosion. It is one more shot, two seconds long, of something small.
Step 7 — Copy the two-shot version
Here is the scene above as a prompt pair, written so the walk stays identical between them. Generate the first, then the second, then cut the second into the middle of the first.
SHOT A — THE WALK (wide)
@HERO walks slowly toward the camera down a wrecked street at sunrise, jacket torn, face cut and dirty, exhausted but upright. His right fist stays closed at his side. Handheld, slight telephoto compression, low warm sun behind him, dust in the air. No cuts, no camera moves other than the follow.

SHOT B — THE INSERT (close-up)
A tight close-up of the same right hand at his side as it opens, revealing a creased and water-damaged photograph of a woman, held carefully. Same street, same sunrise light, same dust. The hand is still moving with his walk. Hold on the photograph, then let his fingers close over it again.

CUT THEM: play SHOT A, cut to SHOT B at the midpoint, cut back to SHOT A. Drop the music out on the cut to B and leave only footsteps for the rest of the scene.
What to change and what to leave alone
Swap the street, the light, the injury and what is in the photograph — those are yours.
Leave alone the things that make the trick work: the fist is closed in A and opens in B, the light and the dust are described identically in both so the insert cuts cleanly, and the music leaves on the cut rather than fading. The silence is doing as much as the photograph.
Step 8 — What the genre will still fight you on
Honest limits, so you spend your generations where they work.
Crowds scatter into wrong anatomy the moment they matter — keep people few and far, or in silhouette. Spoken dialogue with clean lip-sync is still the hardest thing to produce, and a hero speech is exactly the wrong thing to attempt first. Exact physical contact — a punch landing, a grip on a specific ledge — is where weight and geometry break; write the instant either side of it. Capes and long hair in fast motion drift between frames, so favour shorter garments or slower moves when the costume has to stay readable.
None of that stops you making a superhero short. It decides which shots are in it.
Step 9 — Cut it short and end on the small thing
Assemble the approved shots, trim hard, and get out of every shot a beat earlier than is comfortable.
Then end on the quiet one. Origin, power, landing, and a hand closing over a photograph is a complete film — and it is a better thing to have made than four minutes of things exploding behind someone whose face you never learned.
Limitations & common mistakes
- Only upload a face you own or have permission to use — this is the one step with consequences outside the edit.
- A face built from one photo is weakest from behind and in profile, because the source only ever showed the front.
- Crowds, clean spoken dialogue and exact physical contact remain the hardest shots in this genre.
- Capes and long hair drift between frames in fast motion; slower moves hold the costume together.
- Extending a clip inherits the previous shot's last frame, so a stretch started from a frame where everything has stopped has nothing to continue.
Frequently asked questions
Can you put your own face in an AI film?
Yes. Open a project in the editor, click Create actor under CAST, and pick Upload a face — it turns a real face photo into a consistent AI actor and generates a character sheet from it. Note that the standalone builder at /actors/create is the design-from-scratch half only; the upload is in the dialog. Only upload a face you own or have permission to use.
How do you make an AI video longer than one clip?
Stretch the clip on the Director Board. The length you drag to is handed to the generate step as the duration to fill, and the continuation carries the previous shot's last frame — so the actor, the location and the light continue across the join instead of resetting. The same action is available from a clip's menu as Continue from here.
Why do AI superhero shots look fake?
Usually because they break at the moment of contact — hands passing through metal, weight going missing. Write the instant just before or just after instead: catching something mid-air, or the street erupting behind the hero. You get the same read without asking the model to solve contact physics.
How do you make an AI hero scene feel emotional?
Insert one close-up and take the music out. The same walk, with a hand opening on a damaged photograph and only footsteps on the soundtrack, reads as loss instead of victory — with no change to the performance. Editing does what prompting cannot.
What makes a good photo to build an AI actor from?
Even light, both eyes visible, a neutral expression and nothing across the face. Avoid sunglasses, hard side light, three-quarter angles, heavy filtering and group photos cropped down. A weak source photo carries into every shot that actor appears in and cannot be fixed with a better prompt later.
Written by
Adkeet Team · AI Creative StudioThe Adkeet team builds AI filmmaking and advertising tools — the Actor Creator and the Cinematic Engine Studio. These guides come from workflows we run inside the product every day.
Related tutorials
Make your superhero short
Upload a face, write the power moment, and cut to the thing that makes it matter.